ABSTRACT
Esthetic treatment of a single darkened tooth represents a great challenge to the dental practitioner. The properties of dental ceramic—colour stability, mechanical strength, clinical longevity, esthetic appearance and compatibility with periodontal tissues—make this material a good choice for such treatment. We present a case of restoration of a single, highly darkened anterior tooth with a feldspathic porcelain veneer. Resolution involved preparation of the dental structure guided by orientation grooves and provisional restoration using composite resin, a silicone impression and adhesive luting. Conservative use of porcelain laminate veneers provides satisfactory esthetic outcomes and preserves sound tooth structure. The patient was very satisfied with the result and had no complaints during 2 years of follow-up.
Introduction
Esthetic treatment of a single discoloured anterior tooth presents a challenge in clinical practice. After dental bleaching, the most frequently used treatment for discoloured teeth involves laminates, which mask or reduce the discoloration1,2 and can reproduce the characteristics of the tooth structure.3 The biomimetic characteristics of ceramic laminate veneers allow them to behave similarly to natural teeth in terms of strain and stress transference.4 In this article, we present a case of a restoration of a single, highly discoloured anterior tooth with a feldspathic ceramic laminate.
Case Report
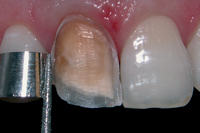
A 25-year-old woman complained about the darkness of her maxillary central incisor (Figs. 1a and 1b). During clinical evaluation, the position of the tooth was observed to be slightly more labial at the distal third of the crown (Fig. 2). The severe discoloration and the position of the tooth limited esthetic resolution using direct and conservative techniques, such as dental bleaching and restoration with composite resin veneer. Therefore, a porcelain laminate veneer was chosen to correct position and colour mismatch.
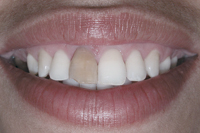 Figure 1a: Patient's initial smile.
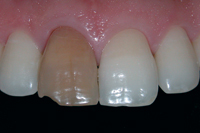 Figure 1b: Close-up of tooth 11 showing severe darkening.
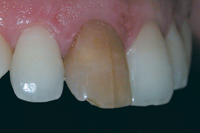 Figure 2: Tooth 11 was slightly labial at the distal third of the crown.
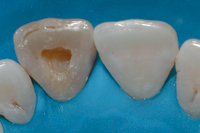 Figure 3: Pulp chamber in tooth 11 after removal of the cement filling that caused the discoloration.
Previous endodontic treatment of the tooth was found to be adequate. However, filling cement inside the pulp chamber had caused the severe discoloration. Thus, the remnants of the filling material were removed (Fig. 3), and the pulp chamber was restored using a hybrid composite resin (Venus, Heraeus Kulzer, Hanau, Germany).
Tooth Preparation
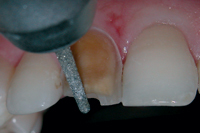
A round diamond bur (no. 1012, KG Sorensen, São Paulo, Brazil, Fig. 4) was used to determine the margin of the cervical region of the tooth. Two vertical depth-orientation grooves (Fig. 5) were made on the labial surface with a tapered round-ended diamond bur (no. 2135, KG Sorensen, Fig. 4) along the longitudinal axis of the tooth. Using the depth of the grooves as a guide, the labial surface was reduced using the same diamond bur. The distal half of the labial surface was further reduced to correct the position of the tooth and better accommodate labial movement of the facial surface.
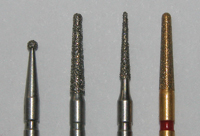 Figure 4: Left to right: burs 1012, 2135, 2200 and 2135F.
 Figure 5: Cervical and vertical depth-orientation grooves made during preparation of the tooth.
Preparation of the proximal area is essential and particularly important to ensure that the restoration–tooth interface is hidden (Fig. 6). The adjacent tooth was protected with a metal matrix while a thin diamond bur (no. 2200, KG Sorensen, Fig. 4) was used to prepare the proximal surface.
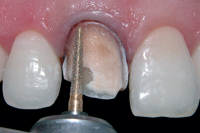
Two mm of the incisal edge was also removed (Fig. 7). The incisal finishing line consisted of a palatal chamfer resulting in enamel and composite margins. The preparation margins were finished with diamond burs (no. 2135, 2135F; KG Sorensen, Fig. 4) to form a gingival chamfer after intracrevicular insertion of a retraction cord (no. 00 Ultrapack, Ultradent Dental Products, South Jordan, UT, Fig. 8). This helped define the cervical margin so that the laboratory technician could clearly identify the desired extent of the veneer.
 |
 |
 |
||||
| Figure 6: Proximal reduction to ensure the restoration–tooth interface is hidden. | Figure 7: Incisal reduction. | Figure 8: Finishing the preparation with a fine-grain diamond bur. | ||||
Impression
The first impression of the prepared tooth was made with silicone putty (Exaflex Putty, GC America, Alsip, IL) on a stock tray, with the retraction cord ensuring that a sulcular space was retained for the light impression material. To make space for the light material (Examix NDS, GC America), the heavy material was partly removed by grinding the interproximal and prepared-tooth areas of the mold. After the cord had been removed, low-viscosity material was injected onto the prepared tooth and the first impression, which was immediately carried to the patient's mouth. An impression of the opposing arch and the occlusal registration are critical if the incisal edge of the veneer is involved in guidance.
Provisional Restoration
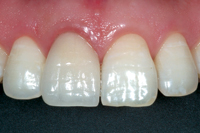
After the final impression was made, a temporary restoration was fabricated using a composite resin to protect dental tissues and re-establish tooth shape (Figs. 9a and 9b).
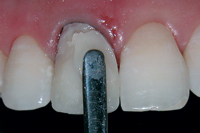 Figure 9a: Provisional restoration with resin composite.
 Figure 9b: Final appearance of the provisional restoration.
Laboratory Prescription
Close communication with the dental laboratory technician is essential. Photographs taken before and after preparation can help ensure accurate shape, shade, texture and other characteristics.
In our case, the veneer was fabricated with a feldspathic porcelain material (EX-3, Noritake Co., Tokyo, Japan) based on a refractory die system, following the manufacturer's recommendations.
Resin-Based Luting Procedure
After carefully checking the proximal contacts, shade match, contour and marginal adaptation, luting was performed. A gingival retraction cord was used to prevent contamination by gingival fluid. After cleaning, the tooth surface was etched for 20 seconds with 37% phosphoric acid, then rinsed for 20 seconds. Excess water was removed with absorbent paper, and an adhesive system was applied to the prepared surface (Scotchbond Multipurpose Plus, 3M ESPE, St Paul, MN).
At the same time, the ceramic veneer was etched for 2 minutes with 10% hydrofluoric acid (Dentsply, Petropolis, RJ, Brazil), washed with water and dried. A silane agent (Dentsply, Petropolis) was mixed and applied to the internal surface of the veneer; after 1 minute, a catalyst (Scotchbond Multipurpose Plus, 3M ESPE) was also applied to add a chemical reaction to the light-curing process. Finally, dual cement, A2 shade (RelyX ARC, 3M ESPE), was placed on the internal veneer surface and the veneer was placed on the prepared tooth and pressed lightly with the fingers. Excess interproximal cement was removed with a microbrush and dental floss. The veneer was covered with a glycerin gel as an oxygen barrier to ensure better polymerization of the resin cement and then light polymerization was carried out on both surfaces for 120 seconds. After the margins were finished and polished, occlusion was checked and no adjustments were needed (Figs. 10 and 11).
Follow-Up
The patient was monitored clinically for 2 years. During that time, the marginal integrity of the restoration was maintained and no inflammation was observed in the gingival margin. The restorative treatment remained esthetically acceptable throughout the 2 years (Fig. 12).
 |
 |
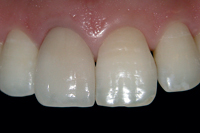 |
||||
| Figure 10: Porcelain laminate veneer surface immediately after adhesive luting. | Figure 11: Postoperative view of the seated porcelain laminate veneer restoration. | Figure 12: Close-up taken at the 2-year follow-up visit. | ||||
Conclusion
Porcelain veneers are useful adjuncts to dentists' armamentaria; they help in the management of esthetic problems, minimizing dental tissue reduction. However, they require the dentist to pay close attention to detail throughout the whole clinical procedure.
THE AUTHORS
|
Dr. Freire is a PhD student, School of Dentistry, Pontifical Catholic University of Parana, Curitiba, Parana, Brazil. |
|
|
Dr. Archegas is a PhD student, School of Dentistry, Pontifical Catholic University of Parana, Curitiba, Parana, Brazil. |
Acknowledgements: The authors thank Dr. Evelise M. Souza and Dr. Sergio Vieira for their dedication during the execution of the case and the writing of the text.
Correspondence to: Dr. Andrea Freire, Programa de Pos-graduação em Odontologia, R. Imaculada Conceição, 1155, Curitiba – PR – Brazil 80215-901. Email: andreavfreire@yahoo.com.br
The authors have no declared financial interests in any company manufacturing the types of products mentioned in this article.
This article has been peer reviewed.
References
- Aristidis GA, Dimitra B. Five-year clinical performance of porcelain laminate veneers. Quintessence Int. 2002;33(3):185-9.
- Fradeani M, Redemagni M, Corrado M. Porcelain laminate veneers: 6- to 12-year clinical evaluation — a retrospective study. Int J Periodontics Restorative Dent. 2005;25(1):9-17.
- Anusavice KJ. Degradability of dental ceramics. Adv Dent Res. 1992;6:82-9.
- Magne P, Douglas WH. Cumulative effects of successive restorative procedures on anterior crown flexure: intact versus veneered incisors. Quintessence Int. 2000;31(1):5-18.